Done, finally!!! Today is very tiring, yesterday I had formatted my laptop to use Windows 7. One thing I forgot was I didn't have my Adobe CS4 installers with me in hostel. I needed it to finish this tutorial. So, after CG class, i rented a car from 'Pooh'. The installer DVD was with my friend back in KL, so I drove all the way there. It was raining very heavily so the traffic was not as fast as usual. After retrieving the DVDs, I drove back to Cyberjaya. I almost had an accident as I drove fast and almost hit a car because the brakes were not functioning well due to the heavy rain. Thank god I'm all right and managed to get back safely!! :D
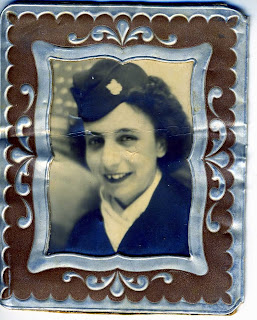
Anyway, here are my steps on retouching this photo :
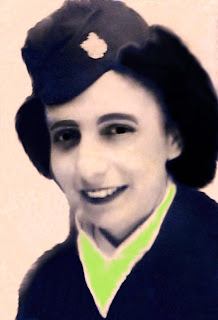
-1st, I make several duplicated layers to make different editing for the purpose of seeing the effects
-I played a bit with the colours to make sure that there are a bit contrast.
-I used both Healing Brush Tool and Clone Stamp Tool to make the her skin, hat and cloth smooth. I also used the Clone Stamp Tool to make her teeth even :D
-About her collar, I used Brush Tool for colouring it and used Smudge Tool to make it look a old. so it seems original.
-The same goes for her hair, I used the Brush Tool to colour it black but only on a certain parts. Then I used the Smudge Tools again to even it. I also used the Blur Tool to make it look a bit original.
-For the background colour, 1st I used the Clone Stamp Tool and took the sample from the top right background as it seems as the best sample. Then I used Healing Brush Tool to make it smooth at the edges.
-Lastly, I played again with the whole image colour to see which would look better.
-I cropped the image using the Rectangle Marquee Tool.
-Well, that's all I could remember after about two hours of photo retouching ;)
 I decided to make a birthday greeting card for assignment 2. Well, my dad's b'day is on january which is very soon. So i figured i'd make one for him (2 in 1 work). :D I chose this colour because i dislike bright type colours.
 I made the balloons using the ellipse tool. I used 3 different fonts for the wish.
 Next i draw a box and make it as the present. The ribbon is really tricky...
 Finally, wah lah!!! Done :D I'm not really good with all the explanations... Added some more small design pattern using ellipse tool, rectangle tool, etc.


